上QQ阅读APP看书,第一时间看更新
How it works...
This section explains how we create our Spark cluster and configure our first dataframe.
- In Spark, we use .master() to specify whether we will run our jobs on a distributed cluster or locally. For the purposes of this chapter and the remaining chapters, we will be executing Spark locally with one worker thread as specified with .master('local'). This is fine for testing and development purposes as we are doing in this chapter; however, we may run into performance issues if we deployed this to production. In production, it is recommended to use .master('local[*]') to set Spark to run on as many worker nodes that are available locally as possible. If we had 3 cores on our machine and we wanted to set our node count to match that, we would then specify .master('local[3]').
- The dataframe variable, df, is first created by inserting the row values for each column and then by inserting the column header names using the following script:
df = spark.createDataFrame([('Male', 67, 150), # insert column values
                            ('Female', 65, 135),
                            ('Female', 68, 130),
                            ('Male', 70, 160),
                            ('Female', 70, 130),
                            ('Male', 69, 174),
                            ('Female', 65, 126),
                            ('Male', 74, 188),
                            ('Female', 60, 110),
                            ('Female', 63, 125),
                            ('Male', 70, 173),
                            ('Male', 70, 145),
                            ('Male', 68, 175),
                            ('Female', 65, 123),
                            ('Male', 71, 145),
                            ('Male', 74, 160),
                            ('Female', 64, 135),
                            ('Male', 71, 175),
                            ('Male', 67, 145),
                            ('Female', 67, 130),
                            ('Male', 70, 162),
                            ('Female', 64, 107),
                            ('Male', 70, 175),
                            ('Female', 64, 130),
                            ('Male', 66, 163),
                            ('Female', 63, 137),
                            ('Male', 65, 165),
                            ('Female', 65, 130),
                            ('Female', 64, 109)],
                           ['gender', 'height','weight']) # insert header values
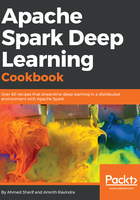
- In PySpark, the show() function gives the ability to preview the top 20 rows, as seen in the following screenshot when using the preceding script:
